
KhetiVidyaहिंदी
All crops

Vegetable · Brassicaceae (mustard family)

Cauliflower

Phool Gobhi · फूलगोभी · Brassica oleracea var. botrytis

Match the variety to the month, and a white curd follows.

Cauliflower is the busiest winter vegetable of the North Indian plains. The white 'flower' we eat is a curd — thousands of tightly packed flower buds that never opened. Varieties are grouped by the temperature they need to form that curd, so the sowing month and the variety group must always match.

Nursery sowing
1 Sep – 31 Oct
Harvest
1 Dec – 31 Mar
Duration
110–160 days
Yield
81–121 q/acre
200–300 q/ha
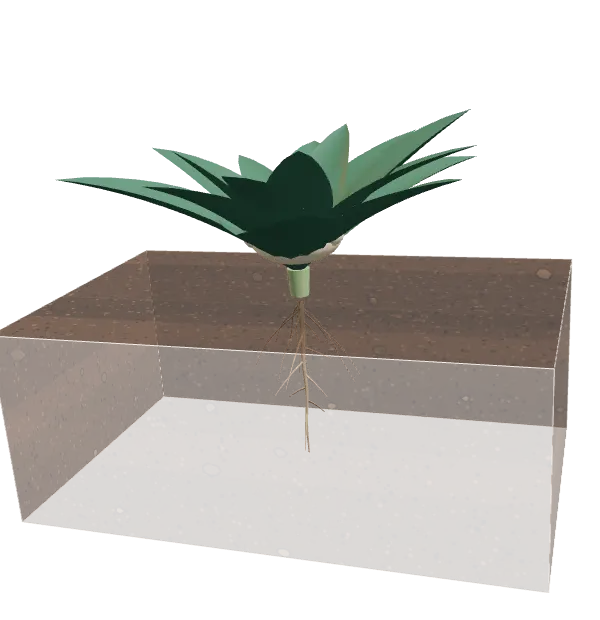
Cauliflower plant with its roots, in a glass tank

Harvest · roots shown through the soil

At a glance

Cauliflower in one look

Mid-late groups form curds at about 16–20 °C; Snowball types need the cold of December–February (10–16 °C). Plant a group in the wrong month and you get tiny 'buttons' or loose, leafy curds.

Nursery sowing

1 Sep – 31 Oct

Transplanting

1 Oct – 5 Dec

Harvest

1 Dec – 31 Mar

110–160 days from sowing

Temperature

10–25 °C to grow

20–30 °C at sowing

Soil

Well-drained loam or sandy loam, rich in organic matter

pH 6–7

Seed rate

0.1–0.2 kg/acre

0.25–0.5 kg/ha

Spacing

60 × 45 cm

1–1.5 cm deep

Irrigations

8–12

4 critical stages

Yield

81–121 q/acre

200–300 q/ha

Season

AugSepOctNovDecJanFebMarAprMayJun
Grown most inUttar PradeshBiharHaryanaPunjabMadhya Pradesh

Cauliflower is a heavy feeder and hates waterlogging. In acidic soils molybdenum gets locked up and leaves turn into thin 'whiptails'.

Seed to harvest

Watch cauliflower grow, stage by stage

Scroll through the season. The plant in the glass tank grows to each stage — roots and all — and every card says what the crop is doing and what you should do in the field that week.

Cauliflower plant with its roots, in a glass tank

Stage 1 of 7

Nursery sowing

Day 0–5

  1. 1Day 0–5

    Nursery sowing

    Seed is sown 1 cm deep in raised nursery beds.

    Your job · Cover with fine manure and straw, and water lightly with a rose can.

  2. 2Day 5–10

    Germination

    Two heart-shaped seed leaves push through in 4–6 days.

    Your job · Remove the mulch, water lightly and watch for damping-off.

  3. 3Day 10–40

    Seedling & transplanting

    True leaves form; at 4–6 weeks seedlings with 4–5 leaves are lifted and transplanted.

    Your job · Harden the seedlings, transplant in the evening onto ridges and irrigate at once.

  4. 4Day 40–80

    Leaf growth

    The plant builds a big frame of leaves — the bigger the frame, the bigger the curd.

    Your job · Top-dress nitrogen, hoe, earth up and irrigate regularly.

  5. 5Day 80–95

    Curd initiation

    A small white curd appears in the centre of the plant.

    Your job · Keep moisture even and check for aphids and diamondback moth.

  6. 6Day 95–115

    Curd development

    The curd swells fast. Direct sun turns it yellow.

    Your job · Blanch: fold or tie the inner leaves over the curd to keep it white.

  7. 7Day 115–160

    Harvest

    Curds reach full size while still compact and white.

    Your job · Cut curds every few days as they mature — don't wait until they loosen.

The seed

Good seed is half the harvest

Use certified seed of a variety bred for your region, at the right rate, and treat it before sowing.

Cauliflower seeds, close up

One seed

≈ 2 mm

Seed rate

0.1–0.2 kg/acre

0.25–0.5 kg/ha

1000-seed weight

3.5 g

Recommended varieties

Pusa SharadMid-late group; compact white curds from late November into December.
Pusa Hybrid 2Mid-late hybrid; uniform, solid white curds in December.
Pusa PaushjaMid-late group; curds ready December–January.
Pusa Snowball 1Late Snowball group; snow-white curds in January–February.
Pusa Snowball K-1Late Snowball group; dense white curds, harvested January–February.
Pusa Snowball 16Late Snowball group for the coldest months.

Seed treatment

  1. 1Dip the seed in hot water at 50 °C for 30 minutes to kill black-rot bacteria, then dry it in the shade.
  2. 2Coat the seed with thiram or captan at 2–3 g per kg, or with Trichoderma at 4–5 g per kg, against damping-off.
  3. 3Hybrid seed usually comes treated — check the packet before treating again.

Raising the nursery

  1. 1Make raised beds about 3 m long, 1 m wide and 15 cm high so water never stands on the seedlings.
  2. 2Mix 2–3 baskets of well-rotted manure into each bed and level it to a fine, crumbly surface.
  3. 3About 100 m² of nursery (roughly 30 beds) raises enough plants for one hectare — that is 10–15 g of seed per bed.
  4. 4Sow thinly in lines 5–7 cm apart and 1 cm deep, cover with fine manure and a thin straw mulch, then water with a fine rose can.
  5. 5Remove the mulch as soon as seedlings appear. Water lightly and never let the beds stay soggy — wet, crowded beds bring damping-off.
  6. 6If seedlings start collapsing at soil level, drench the beds with Trichoderma or captan (2 g per litre).
  7. 7Stop watering 4–5 days before lifting to harden the plants. Transplant at 4–6 weeks old, with 4–5 true leaves.

Field & sowing

Prepare the land, then sow at the right gap and depth

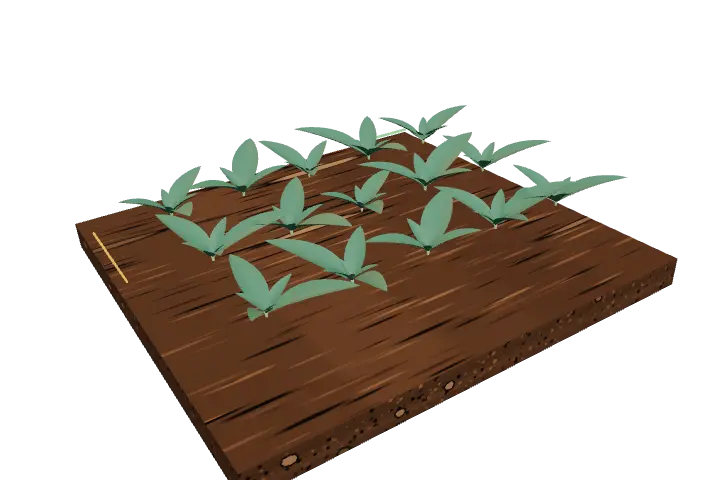
Raise seedlings in a nursery, then transplant onto ridges

A Cauliflower field, showing rows and spacing

Layout

Ridges & furrows

Row to row

60 cm

Plant to plant

45 cm

Depth

1–1.5 cm

Land preparation

  1. 1Plough 3–4 times until the soil is fine and free of clods.
  2. 2Spread 20–25 tonnes of well-rotted farmyard manure per hectare and mix it in during the last ploughing.
  3. 3Level the field, then make ridges 60 cm apart with irrigation channels.
  4. 4Make sure excess water can drain out — standing water rots the roots.

Sowing, step by step

  1. 1Make ridges 60 cm apart. Mid-late varieties go 45 cm apart on the ridge; Snowball types can go 45 × 45 cm on flat beds.
  2. 2Transplant in the evening or on a cloudy day so the seedlings do not wilt.
  3. 3Plant on the side of the ridge, about two-thirds up, and press the soil firmly around the roots.
  4. 4Irrigate immediately after planting.
  5. 5Fill gaps with spare nursery plants within 7–10 days.

Feeding the crop

How much fertiliser, and when

These are the standard doses for a medium-fertility field. Your Soil Health Card can raise or lower them — test first, then feed.

Nutrient dose

Nitrogen (N)49 kg/acre · 120 kg/ha
Phosphorus (P₂O₅)24 kg/acre · 60 kg/ha
Potassium (K₂O)24 kg/acre · 60 kg/ha

Plus 25 t/ha (10 t/acre) of well-rotted farmyard manure or compost.

When to apply

  1. 1At transplanting: half the nitrogen with all the phosphorus and potash.
  2. 2Top-dress the rest of the nitrogen in two equal doses about 30 and 45 days after transplanting, followed by earthing up and irrigation.

Micronutrients, sulphur & biofertilisers

  1. 1Boron: where curds have turned brown or stems hollow before, mix 10–15 kg borax per hectare into the soil before transplanting.
  2. 2Molybdenum: in acidic soils, 1–1.5 kg sodium molybdate per hectare prevents whiptail.

Bags for your field

For 1 acre of Cauliflower

What to buy

Urea

2

bags · 85 kg

DAP

1

bag · 53 kg

MOP

1

bag · 40 kg

Nutrients in it: N 49 kg · P₂O₅ 24 kg · K₂O 24 kg

Also add farmyard manure or compost: 10 t

  • Don't put it all in at once: follow the timing on the Cauliflower page.
  • Your Soil Health Card can raise or lower these amounts. If you have one, follow it.
  • Using SSP, NPK complexes or gypsum instead changes these amounts; the nutrient dose is what matters.

Not yet checked against a package of practices. Confirm the dose with your KVK before you buy.

Urea has 46 % N; DAP 18 % N and 46 % P₂O₅; MOP 60 % K₂O. Urea comes in 45 kg bags, DAP and MOP in 50 kg.

Water

8–12 irrigations — never miss the critical ones

A crop forgives a late irrigation at some stages and punishes it at others. These are the days that decide yield.

Day 35
Day 60
Day 85
Day 105
SowingDay 160

Critical irrigations

  1. Day 35Just after transplanting
  2. Day 60Rapid leaf growth
  3. Day 85Curd initiation
  4. Day 105Curd development

Watering tips

  1. 1Water every 8–10 days in October–November and every 12–15 days in the cold months.
  2. 2Never let the soil dry out once the curd starts forming — stress gives small, loose or ricey curds.
  3. 3Light, regular watering beats a heavy flood; standing water rots roots.
  4. 4A light irrigation before a frosty night protects the crop.

Protection

Weeds, pests and diseases to watch for

Walk the field every week. Most problems are cheap to stop early and expensive to fix late. For any spray, follow the label dose and check with your KVK.

Pest

Diamondback moth

Signs · Small, pale-green caterpillars feed under the leaves, leaving papery 'windows' and holes; they wriggle and drop on a thread when touched.

Manage · Grow 2 rows of mustard after every 25 rows as a trap crop and put up pheromone traps. Spray Bacillus thuringiensis (Bt) or 5% neem seed kernel extract early. If damage is heavy, use spinosad or chlorantraniliprole — as per label / your KVK.

Pest

Aphids

Signs · Colonies of tiny grey-green insects on leaves and inside the curd from December; leaves curl and turn sticky.

Manage · Use yellow sticky traps and spray neem oil at the first colonies. If they spread, spray imidacloprid or thiamethoxam — as per label / your KVK — and respect the waiting period before harvest.

Disease

Black rot

Signs · V-shaped yellow patches starting at leaf edges, with blackened veins; plants stay stunted.

Manage · Hot-water treat the seed, keep a 2–3 year gap between cabbage-family crops and remove infected leaves. Copper oxychloride with streptocycline can slow its spread — as per label / your KVK.

Disease

Alternaria leaf spot

Signs · Round brown spots with rings like a target on leaves; dark spots on the curd in humid weather.

Manage · Use clean seed and rotate crops. At the first spots spray mancozeb at 2.5 g per litre, repeating after 10–15 days — as per label / your KVK.

Disorder

Buttoning

Signs · Plants stay small and form a tiny, early curd the size of a button.

Manage · Plant the right group in the right month, transplant seedlings no older than 6 weeks, and do not let the crop go short of nitrogen or water.

Disorder

Browning (boron deficiency)

Signs · Brown, water-soaked patches on the curd, a hollow stem and bitter taste.

Manage · Mix borax into the soil before transplanting where it has happened before; on light soils your KVK may advise a borax spray.

Disorder

Riceyness

Signs · The curd surface turns velvety and grainy as the flower buds start to grow.

Manage · Caused by warm spells at curd formation, too much nitrogen or late harvest. Choose the right variety for the month and cut curds on time.

Weeds

Common · Bathua (Chenopodium), krishneel (Anagallis), senji (Melilotus), motha (Cyperus)

  1. 1Hoe and weed 2–3 times in the first 6 weeks; combine the last hoeing with earthing up.
  2. 2Pendimethalin sprayed on moist soil before transplanting keeps early weeds down — as per label / your KVK.
  3. 3A straw mulch between rows suppresses weeds and saves water.

Harvest

Harvest on time, dry it well, store it safe

A good crop gives

81–121q/acre

200–300 quintal per hectare

Snowball types on good soil give the upper end.

When is it ready?

  1. 1The curd is full-sized, firm, compact and white.
  2. 2The surface is still smooth — not loose, grainy or yellow.
  3. 3Plants mature unevenly, so check the field every 2–3 days.

Harvesting

  1. 1Cut the stem with a sharp knife, keeping a few leaves around the curd to protect it.
  2. 2Harvest in the cool of the morning.

After harvest & storage

  1. 1Trim the leaves to just above the curd for market.
  2. 2Grade by size and whiteness; pack in crates or baskets without stacking curds face to face.
  3. 3Store at 0–1 °C and high humidity for 2–4 weeks.

Golden rules for cauliflower

  1. 1The month decides the variety: never plant a Snowball type in September or a mid-late type in December.
  2. 2Old, overgrown nursery plants give buttons — transplant at 4–6 weeks.
  3. 3Blanch the curds; a yellow curd sells for much less.
  4. 4Grow mustard as a trap crop for diamondback moth instead of spraying again and again.
  5. 5If curds have turned brown before, the soil is short of boron — fix it before transplanting.